Tuesday, September 28, 2010

Customized Wall Art - Easy and Inexpensive!

Hi!

As promised during our master bedroom tour here this weekend, I'm sharing how we made our custom wall art.  It was super easy and we made two 20 x 20 inches panels for under $20. 

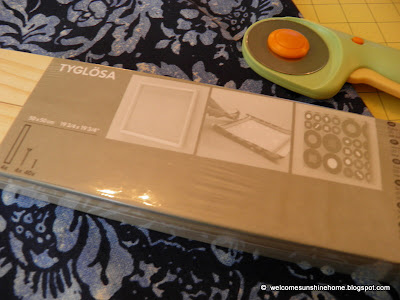
It started when we came across the Tyglosa frames for fabric at Ikea.  They cost $5 per frame and after considering how easily we could make a DIY version for less we decided to just buy two.  I'll share lots of photos today so you can get some ideas for making your own version for even less.

Supplies list for two panels
2 20x20 inches frames
2 pieces of fabric at least 25.5 x 25.5 inches
Scissors or mat & rotary cutter
Drill or screwdriver
Electric stapler

When you open Ikea's packaging find the four screws mixed in with the nails.  You can set the little nails aside because we aren't using them.
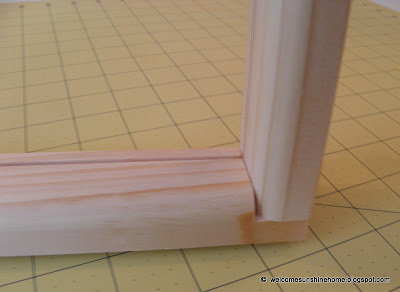
 Put together the frames.  I bet you can do each one in under 60 seconds...  Use these photos to help you come up with your DIY adaptation.  I'll be poking around in the basement looking for scraps so I can make some...

After I put the frames together I moved on to cutting my fabric.  I used one yard of fabric that was about 60 inches wide.  I found it on the bargain table at Joanns for $9/yard.  Score!  It's Eddie Bauer blue batik that's used in their Piedmont collection (thanks google search!).  I loved the canvas texture and rich colors.  If you're in the Portland area and like this, there was plenty left on the decorator fabric roll on Saturday.

Any way, I lost my mind when I started working with the fabric and didn't make the best choices.  I should have salvaged larger pieces of fabric but instead I ended up with strips leftover.  You'll see... 

I started by cutting my piece of fabric in half so I had two 30 X 36 inch pieces.

 Next, I decided that I wanted to work with 30 x 30 inches pieces because the frames are square.  If you were thinking, "That fabric is so 2009" you are correct.  Don't worry about any of the edges because they won't show anyway.

 Ta da!  There's my square fabric!  Next, I put my frame flat side down on the backside of the fabric and quickly realized that I'd be trimming a lot of fabric soon.  Oops.

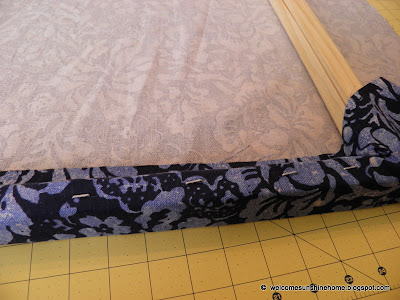
 My favorite part...staple it!  I didn't bother ironing because I knew this fabric would stretch well on the frame.  Hammer any staples that don't go in all the way.

 Trim away the excess fabric.

Staple down the opposite side.

 When you get to the fourth side try to get some help so the fabric stays smooth and tight against the frame (aka no wrinkles or sagging - nobody likes wrinkles or sagging).  Max didn't want to help.

 On the second panel, I saved all the corners for last and I'd do it that way next time.

We're done! 

Here's the master bedroom BEFORE:


Time to hang them up!  Jake measured the placement of the panels above our bed.  He put two screws in the wall for each panel so he could easily adjust them from side to side and align them properly.  They're also more stable and less likely to fall our heads while we're sleeping.
AFTER:

Jake did a great job installing them over our bed precisely where I wanted them.

The fabric panels are great for our bedroom because you enter from the side of the bed.  I love that the pattern wraps around the edges.

So, what do you think?

Since we complete this wall art, I've been thinking of other ways I'd like to apply this concept...
-Do a grouping of panels in different fabrics and various sized frames
-Create a basket weave effect using strips of the same fabric or multiple fabrics
-Display a portion(s) of a quilt that can't be salvaged
-Create a new quilt block using clothing from vacations or kids' clothes
-Reuse a sports or concert t-shirt  (Maybe Famous Joe's Tesla jacket, MJ?  No sense of that being hidden in the back of the closet...hehe)
-Create a layered look
-Transfer a favorite photo to fabric
-Group sarcastic/funny t-shirts for fun rec room art

How would you use these frames?

You can see a tour of our master bedroom here.  Thanks for visiting!


All Thingz Related

CreativeShareWednesdays


UndertheTableandDreaming

Keeping It Simple

Saturday, September 25, 2010

Show Us Your Life - Master Bedroom


Kelly's Korner hosts a weekly Show Us Your Life series and this week's topic is Master Bedrooms.
We decided to get a king size bed and move into our guest room earlier this year.  Both rooms are about the same size.  We switched rooms because the guest room has two windows and our former master bedroom had one.  This old house doesn't have a master bathroom so that wasn't a consideration.

September 2010

Now let's step back and see where we started...

Master Bedroom in 2007 (Guest Room at the time). 
Sorry about these crappy cell phone photos that were taken at night. 


Master Bedroom in 2009 (Guest Room at the time)
Our New Master Bedroom in January 2010


Back to NOW! Master Bedroom in September 2010
Why do sunny rooms look dark on camera?  Any who, we painstakingly removed some pastel 80s wallpaper from this room and painted it Brown Sugar by Kilz in 2006.  I can't find any of those before photos.  The room appears smaller with this furniture layout and bigger bed but I like it.  Before we purchased the new bed, we did our due diligence.  We took measurements of the new bed, removed all the existing furniture from the room, and used painters tape to outline the new room layout on the floor.  Then, we walked around the taped areas and made sure it didn't feel cramped.


I'm still using the walk-in closet in the other room and Jake uses this closet.  

The simple off-white curtains used to be in the Living Room and were retired here.

 This was Jacob's wooden dresser from childhood turned TV console.  We sanded it down some and put a coat or two of white paint on it when we lived in our tiny apartment downtown eight years ago.  I was going to repaint it when we moved it in here but for now I like that it's a bit dirty and beat up.  This is the original hardware and I intend to switch it out but I haven't found the right hardware yet. 

The clever repurpose from dresser to tv console was simple.  Jake removed the top drawer and stowed it away in the basement.  Then, he used a hole saw bit to drill a hole through the back wall of the dresser to feed through the DVR and DVD player cords.  I'm planning to paint the inside of this cubby.

I haven't decided what to do with the empty corner on the other side of the window.

We bought these night tables for our original master bedroom because we wanted something a bit slimmer and taller.  They were being sold as bathroom storage on clearance at walmart.  I liked the beadboard detail on the sides and we thought they'd work.  We were right because they've held up well for five years.

Mine - I've got the alarm clock and a reading lamp.
 Jake's - He has the remotes.

Oh how I love our king size bed.  The sleigh bed is the Louis from Bob's.  We bought it with Bob's Black Label pillowtop mattress and a split foundation in January.   We got it all for under $1,000 because we purchased from their scratch and dents section and rented a truck to take it home.  The sleigh bed simply needed to be cleaned and had a small scratch (full price $499, our price $250).  The mattress had a tiny tear in the gauze-like fabric on the underside (full price $1,099; our price $550).  The Love Story low profile split foundation was discounted because they don't offer split version that matches our mattress  (full price $258, our price $100).  The split foundation was a must because we have a turn in our staircase.  We just barely squeezed the mattress upstairs and Jake was trapped underneath the beast and pressed against the stairs for a bit.  Of course, I was at the top of the stairs and our cell phones were downstairs.  There's a window over the stairs that our neighbors look in from their deck sometimes and I'm sure they were laughing their buns off at us.  Any way, it is a dream to sleep on, we got it all for $950 off the discount furniture store's prices, and it is one of our best purchases ever!  :)


The bedding is a mix from different stores.  The brown quilted coverlet was a $20 clearance find at Kohls.  The patterned duvet set was $50 at Ikea.  The euro shams, decorative pillows, and dust ruffle are from Target.

We found the sheets on clearance at Target in January; an ivory 400 thread count king size sheet set with four pillowcases for $10.  We couldn't believe they rang in at that price.  We went back and got them in chocolate brown too.  Sometimes it's hard to find a decent king size pillowcase for ten bucks.  What a steal! 

This is the Alvine LJUV duvet set from Ikea.  Inside is a black and white Martha Stewart comforter but this duvet provides good coverage.  Here's a closeup of the pattern.  The vines are dark brown rather than green.

We have six Kusiner underbed storage boxes($7.99 each) from Ikea under the bed.  You can find them in the children's section.  We like that they're completely collapsible and that you can get into one without pulling it completely out.  We've only had them for a couple weeks but soon they'll probably be filled with spare bedding, off season clothing, and extra pillows.

We made the wall art above the bed and have another post planned to share the details. UPDATE: you can find my wall art tutorial here.

I like to watch tv and read in here while Jake watches sports in the living room.  Of course, the pups like to hang out in here too.

You can check out our living room here.  Next week's topic is Dining Rooms so I'll be linking up.  Thanks for stopping by and come again soon!  :)


Show Us Your Life with Kelly's Korner
Related Posts Plugin for WordPress, Blogger...
 

Template by: Bright Sunshine Designs by Mary